Inserting a new Worksheet


a.   To insert a single worksheet


i. Click Worksheet on the Insert menu.

b. To insert multiple worksheets.


i. Determine the number or worksheets you want to insert.


ii. Hold down Shift Key, and then select the number of existing worksheet tabs that you want to insert in the open workbook.


Example: If you want to insert three new worksheets, select three existing worksheet tabs and then click Worksheet on the Insert menu.
Note: You can insert maximum 255 Worksheets in a Workbook.


Selecting Data or Cells

i. Text in a Cell : Double-click in the cell, and then select the text in the cell.

ii. A Single Cell : Click the cell, or press the arrow keys to move to the cell.

iii. A Range Of Cells : Click the first cell of the range, and then drag to the last cell

iv. A Large Range Of Cells : Click the first cell in the range, and then hold down Shift Key and click the last cell in the range. You can scroll to make the last cell visible.

v. All Cells on A Worksheet : Click the Select All button.

vi. Nonadjacent Cells Or Cell Ranges : Select the first cell or range of cells, and then hold down Ctrl and select the other cells or ranges.

vii. An Entire Row Or Column : Click the row or column heading.

viii. Adjacent Rows Or Columns : Drag across the row or column headings. Or select the first row or column; then hold down Shift and select the last row or column.

ix. Nonadjacent Rows Or Columns : Select the first row or column, and then hold down Ctrl and select the other rows or columns.

x. Cancel A Selection Of Cells: Click any cell on the worksheet.


Inserting Blank Cells, Rows, or Columns

i. To insert Blank cells, Rows, or Columns do one of the following:
a. To insert new blank Cells: Select the number of cells as you want to insert

b. To insert a single Row : Click a cell in the row immediately below where you want the new row. For example, to insert a new row above row 5, click a cell in row 5.

c. To Insert multiple Rows : Select number of rows that you want

d. To Insert a single Column: Click a cell in the column immediately to the right of where you want to insert the new column. For example, to insert a new column to the left of column B, click a cell in column B.

e. To Insert multiple Columns : Select the number of columns you want .


ii. On the Insert menu, Click Cells, Rows, or Columns.

Deleting Cells, Rows, or Columns


i. Select the Cells, Rows, or Columns that you want to delete.

ii. On the Edit menu, click Delete.
                 
Note: If you are deleting a range of cells, click Shift cells left, Shift cells up, Entire row, or Entire column in the Delete dialog box.

Closing and Exit from Ms Excel


                Closing a Work Book
To close your Active Work Book select File Close from Main Menu or Press Ctrl + F4 simultaneously.

                To exit from Microsoft Excel
To exit  from  Microsoft Excel , Select  File Exit  from Main Menu or press Alt + F4  at the same time.

Opening an Excel Workbook

To open an Excel Workbook use one of the following commands

a. File  Open

b. In Open Dialog Box select the file that you want to open and click Open Button or simply double click on the file.
                    

Saving an Excel Workbook

To save an Excel Workbook
save

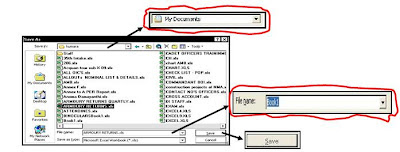
i. File  Save.

ii. Select the location where you want to save the workbook and give a desired name and finally click Save button.


Note : If you want to give a Password to your Excel Workbook, go to Tools  Security Options before you save your Workbook.
                  

Insert and Hiding Toolbars

To Insert or hide a toolbar do one of the following


i. Right-click on any toolbar and then click the toolbar you want to display or hide on the Popup menu.

ii. View --- Toolbar in the Main Menu and then select or deselect toolbars that you want.
                         

Starting Microsoft Excel XP

To start Microsoft Excel use one of the following commands 


i. Click Start  -- All Programs  -- Microsoft Excel

ii. Double Click On Excel icon in Desktop
              

Software & Hardware Requirements for MS Excel XP


i. Operating Systems : Windows 98 Second Edition, Windows Me ,Windows 2000 or Windows XP

ii. Processor Speed   : Minimum 500 MHz

iii. RAM                    : Minimum 64 MB RAM


Ms Excel XP


Excel is a spreadsheet program. Spreadsheets allow easy entering and maintenance of data. Companies often prepare budgets and reports and maintain a large amount of data pertaining to its business. Excel can be used to maintain financial statistics, reports, balance sheets etc. It offers features for quick creation of these statements. Besides offering the features to maintain data, it also offers methods for performing calculations quickly and efficiently and ways to analyze data create consolidated reports and for creating charts to attractively present your data.

Adjusting Margins: Ruler Option

             The margins are located on the Ruler at the top of the screen, on the left and on the right where the gray and white areas meet.

a.
If the Ruler is not displayed, from the View menu, select Ruler
b.
From the View menu, select Print Layout
c.
Move your cursor to the ruler line and position it over the margin you wish to change The cursor will take the shape of a double-headed arrow.
d.
Hold down your mouse button and drag the margin to the desired width ,in Windows to see the margin measurements, hold down the [Alt] key while dragging the margin.
                                         

Keyboard shortcuts

              Keyboard shortcuts make quick navigation in your Word document possible. Instead of using the mouse, you can press keys to perform the same actions. There are keyboard shortcuts for virtually every navigational and managing option in Word.

Tab


To set tabs with leader characters

a.
On the Format menu, click Tabs.
b.
Under Tab stop position, type the position for a new tab, or select an existing tab stop to which you want to add leader characters.
c.
Under Alignment, select the alignment for text typed at the tab stop.
d.
Under Leader, click the leader option you want, and then click Set.


Indentation and Spacing


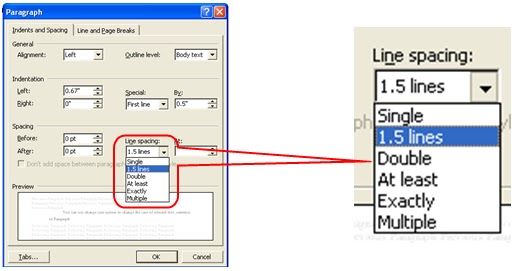
To go to Indentation and Spacing, Select Format → Paragraph

I.             Indentation
Indentation determines the distance of the paragraph from either the left or right margins. Within margins, you can increase or decrease the indentation of a paragraph or group of paragraphs. You can also create a negative indent (also known as an outdent), which pulls the paragraph out towards the left margin. You can also create a hanging indent, in which the first line of the paragraph is not indented, but subsequent lines are.

II.         Paragraph Spacing
a.
Select the paragraphs in which you want to change spacing.
b.
On the Format menu, click Paragraph, and then click the Spacing tab.
c.
Under Spacing, enter the spacing you want in the Before or After box.
                     
Note : If you select exactly or At least for line spacing, enter the amount of space you want in the At box. If you select Multiple, enter the number of lines in the At box.